Working with RL Catalyst
Scenario 1 : Import Linux Node and Install latest version of Tomcat
Importing Linux node and installing latest version of tomcat by adding tomcat-all-rl cookbook.
- Import RLCatalyst instance/VM
- Go to Workzone and expand the Organization tree on the left side to get the environments . Click on Import by IP icon
- Enter <ip address> of the instance in the IP Address field. enter ubuntu as user name, password or pem file and enter all the details and click on import button and wait until Instance Bootstrap Successfully
Please refer to Import By IP for more details
- Install latest version of Tomcat
- Click on Chef-Client Run icon on the imported node in Infrastructure -> Instances tab
- Search for tomcat-all-rl cookbook and add to runlist and click on update runlist button and wait until instance runlist updates . This cookbook will install the latest version of Tomcat
- Access Tomcat
- Once the runlist updates go to Controlpanel -> Additional Parameters -> New Application URL and add Name and URL - http://$host:8080 and save. Now click on your Applink in Infrastructure -> Instances and verify Tomcat running.
Note: If you want to Import Linux Node and Install latest version of JBoss, you can follow the same steps 1 and 2, But to access JBoss you need to follow
- Access Jboss
- Once the runlist updates go to new Tab enter Ip address:8080 and then you will get Welcome page of JBoss.
Following video demonstrates how to import Linux node and install latest version of Tomcat in RLCatalyst:
Scenario 2 : Install Apache on imported node and use service to stop, start and restart Apache
To install Apache on imported node and perform stop, start and restart services follow these steps:
- Create a Service command
- In Settings, Under Gallery setup -> Service command, create a new service by selecting service command type as chef cookbook/recipe. Search for the service_apache in service cookbooks dropdown. Select actions Start,Stop,Restart and save.
Please refer Service Command for more details.
- Import RLCatalyst instance/VM. Ignore this step if you have already executed Scenario 1
- Go to Workzone and expand the Organization tree on the left side to get the environments. Click on Import by IP icon
- Enter <ip address> of the instance in the IP Address field. enter ubuntu as user name, password or pem file and enter all the details and click on import button and wait until Instance Bootstrap Successfully
Please refer to Import By IP for more details.
- Install Apache using chef client run
- Click on Chef-Client run button on the imported node and add apache2 cookbook and click on Update runlist button and wait until instance runlist gets updated
- SSH in to the Node from RLCatalyst and check the apache status
- SSH in to the box from rlcatalyst and run sudo service apache2 status to check the Apache status Apache is running
- Add the service apache to the node
- Go to Controlpanel -> Service Tab -> Click on Add New Service. Choose the apache service and save.
- Stop the service and check the status
- Click on Stop icon and wait till “service run success”
- SSH in to the box from catalyst and run sudo service apache2 status and check the Apache status. You can see that Apache is stopped
- Start the service and check the status
- Go to Controlpanel -> Services and Click on Start icon and wait till “service run success”
- SSH in to the box from catalyst and run sudo service apache2 status Apache is up and running now
- Restart the service and check the status
- Click on Restart icon and wait till “service run success”
- SSH in to the box from catalyst and run sudo service Apache status Apache is up and running now
Following video demonstrates how to Install Apache on imported node and use service to stop Apache in RLCatalyst:
Scenario 3: Deploy Petclinic application in the imported node
By importing a ubuntu node we are deploying here petclinic application:
- Import RLCatalyst instance/VM . Ignore this step if you have already executed Scenario 1
Go to Workzone and expand the Organization tree on the left side to get the environments . Click on Import by IP icon
Enter <ip address> of the instance in the IP Address field. enter ubuntu as user name, password or pem file and enter all the details and click on import button and wait until Instance Bootstrap Successfully
Please refer to Import By IP for more details.
- Install Tomcat Cookbook(tomcat-all-rl) . Ignore this step if you have already executed Scenario 1
- Click on Chef-Client Run icon on the imported node in Workzone -> Infrastructure -> Instances tab
- Search for tomcat-all-rl cookbook and add to runlist and click on update runlist button and Wait until instance runlist updates
- Create a Chef orchestration task, Choose the node and add the cookbooks tomcat-all-rl, deploy_war & Edit cookbook attributes and save
- In Workzone, Under Orchestration ,create a new Chef task and add tomcat-all-rl, deploy_war cookbook and edit the following attributes
- Source code url - https://s3-us-west-2.amazonaws.com/catalystcode/petclinic-2.02.71.war
- Application version – 2.02.71
- Node publice IP – enter the public IP where tomcat is running and present as node in catalyst.
- Execute the task
- After execution of task, go to Controlpanel -> Additional Parameters -> New and add Name and URL - http://$host:8080/petclinic and save. Now click on your Applink in Infrastructure -> Instances and verify petclinic installtion.
Following video demonstrates how to Import Ubuntu Node and Deploy petclinic in RLCatalyst:
Scenario 4 : Update Petclinic application version
Here we are updating petclinic application version 2.02.71 to 2.02.72:
- Import RLCatalyst instance/VM . Ignore this step if you have already executed Scenario 1
Go to Workzone and expand the Organization tree on the left side to get the environments . Click on Import by IP icon
Enter <ip address> of the instance in the IP Address field. enter ubuntu as user name, password or pem file and enter all the details and click on import button and wait until Instance Bootstrap Successfully
Please refer to Import By IP for more details.
- Install Tomcat Cookbook(tomcat-all-rl) . Ignore this step if you have already executed Scenario 1
- Click on Chef-Client Run icon on the imported node in Workzone -> Infrastructure -> Instances tab
- Search for tomcat-all-rl cookbook and add to runlist and click on update runlist button and Wait until instance runlist updates
- Create a Chef orchestration task. Ignore this step if you have already executed Scenario 3.
- In Workzone, Under Orchestration Create a New Chef Task and add tomcat-all-rl, deploy_war cookbooks and edit the following attributes
- Source code url - https://s3-us-west-2.amazonaws.com/catalystcode/petclinic-2.02.71.war
- Application version – 2.02.71
- Node publice IP – enter the public IP where tomcat is running and present as node in catalyst
- Execute the task.
- After execution of task, go to Controlpanel -> Additional Parameters -> New and add Name and URL - http://$host:8080/petclinic and save. Now click on your Applink in Infrastructure -> Instances and verify petclinic installtion.
- Upgrade Petclinic Version
- Edit Chef Orchestration task
- Click on Edit attribute link
- Enter the Source code URL with the latest version https://s3-us-west-2.amazonaws.com/catalystcode/petclinic-2.02.72.war
- Application version – 2.02.72
- Node publice IP – enter the public IP where tomcat is running and present as node in catalyst and save
- Now Execute the task and verify the latest version
- After execution of task, go to Controlpanel -> Additional Parameters -> New and add Name and URL - http://$host:8080/petclinic and save. Now click on your Applink in Infrastructure -> Instances and verify petclinic installtion with the latest version.
Scenario 5 :View History of App deployments & upgrades
To view the history of app deployment follow these steps:
- Execute Scenario 3 to deploy Petclinic application in the imported node
- Once application is installed on the node navigate to Orchestration tab and click on H icon[History], you will find history of the application deployed
Scenario 6 : Deploy a multi-tier application using docker container
Here, we are deploying a petclinic application with 2 docker containers, one for Mysql and one for petclinic.
- Create docker template for Mysql and petclinic
- Go to GallerySetup -> Templates
- Create template for mysql by adding docker repo path
relevancelab/mysqlpetand save- Create template for petclinic by adding docker repo path
relevancelab/tomcatpetand save
- Create a docker blueprint using Mysql and petclinic template
- Go to Design -> Select mysql template -> Click Launch parametrs icon -> Enter container name and add Additional startup as
init.sh-> Click on Add button- Click on Add button to add tomcat template -> select tomcat template and the tag -> Click on Add button
- Click Launch parametrs icon -> Enter container name and Port mapping as
8080:8080and Linked container as mysqlpet:mysql -> Click on Add button- Click Next button to create blueprint
- Import Ubuntu Node
Go to Workzone and expand the Organization tree on the left side to get the environments . Click on Import by IP icon, Enter all the details and click on import button and wait until Instance Bootstrap Successfully
Please refer to Import By IP for more details
- Run Docker cookbook on the instance
- Click Chef client run and Run docker by adding
docker_installcookbook and wait until Instance Runlist Updates & docker icon is displayed on card
- Launch Docker blueprint on Ubuntu node
- Go to Infrastructure -> Blueprints -> Docker -> Next and select the instance and Start. Wait until Done image pull and run message is displayed
- Verify the 2 Contianers
- Once image pull is successfull go to Infrastructure -> Containers tab to see the container details
- Access the Petclinic application
- Access the Petclinic application by accessing $host:8080/petclinic
- SSH in to the ubuntu node form RLCatalyst and verify the containers
- Click on SSH icon, enter the valid details and submit
- Enter the following command
docker psand check the container details
Following video demonstrates how to Deploy a composite docker container(petclinic app with 2 container) in RLCatalyst:
Scenario 7 : Create a new Ubuntu Instance and Install Jboss
Create a blueprint to launch a new Ubuntu instance and install JBoss server on it .
- Add Provider
In Settings, under DevopsSetup -> Providers, add a New AWS provider by entering the valid details
Please refer to Providers for more details.
- Add VMImage for Ubuntu
In Settings, under Gallery setup -> VMImage, add a New VMImage for Ubuntu . The image should be accessible from your AWS account
Please refer to VM Images for more details.
- Create Blueprint using Ubuntu as base Image by adding Jboss Cookbook to runlist
- In Design, under New tab, OSImage template type select ubuntu template and create blueprint by entering the other details and by adding jboss7_rl cookbook in configure runlist parameters and save
- To verify Jboss installation
- Launch the Blueprint from Workzone -> Infrastructure -> Blueprints. After launch of Blueprint go to Infrastructure -> Instances, once the node bootstraps go to Controlpanel -> Additional Parameters -> New Application URL and add Name and URL - http://$host:8080 and save. Now click on your Applink in Infrastructure -> Instances and verify Jboss installtion.
Following video demonstrates how to Launch New Ubuntu Instance and Install Jboss in RLCatalyst:
Scenario 8 : Deploy Windows App on IIS
We are deplying MyShopper application with deploy_iis cookbook.
- Add Provider . Skip this step if Scenario6 is already executed
In Settings, under DevopsSetup -> Providers, add a New provider by entering the valid details
Please refer to Providers for more details.
- Add VMImage for Windows(Public AMI to be added for Windows2012).
In Settings, under Gallery setup -> VMImage, add a New VMImage for Windows
Please refer to VM Images for more details.
- Create Blueprint using Windows base image by adding IIS cookbook to runlist
- In Design, under OSImage template type select windows template and create blueprint by entering the other details and by adding deploy_iis cookbook in configure runlist parameters and save
- Launch Blueprint and Verify IIS Installation
- Launch the Blueprint from Workzone -> Infrastructure -> Blueprints. After launch of Blueprint go to Infrastructure -> Instances, once the node bootstraps enter <ipAddress> of the instance in new tab it will take you to the MyShopper application home page.
Following video demonstrates how to Launch Windows Instance and Install IIS in RLCatalyst:
Scenario 9 : Create a new Ubuntu Instance, Install Tomcat and upgrade to latest version
Here we are creating one ubuntu instance, installing tomcat by adding tomcat-all-rl cookbook and upgrading to the latest version of tomcat.
- Add Provider . Skip this step if Scenario6 is already executed
In Settings, under DevopsSetup -> Providers, add a New provider by entering the valid details
Please refer to Providers for more details.
- Add VMImage for Ubuntu . Skip this step if Scenario6 is already executed
In Settings, under Gallery setup -> VMImage, add a New VMImage for Ubuntu
Please refer to VM Images for more details.
- Create Blueprint using Ubuntu as base Image and Tomcat Cookbook
- In Design, under OSImage template type select ubuntu template and create blueprint by entering the other details and by adding tomcat-all-rl cookbook in configure runlist parameters and save
- Launch Blueprint and Access Tomcat
- Launch the Blueprint from Workzone -> Infrastructure -> Blueprints. After launch of Blueprint go to Infrastructure -> Instances, once the node bootstraps go to Controlpanel -> Additional Parameters -> New Application URL and add Name and URL - http://$host:8080 and save. Now click on your Applink in Infrastructure -> Instances and verify Tomcat installtion.
- Chef Client Run to upgrade Tomcat version to 8.0
- Click on Chef-Client run button and Edit the cookbook attributes and select the latest Tomcat Version, save and update runlist Wait until the Instance runlist updates and Now click on your Applink in Infrastructure -> Instances and verify Latest Tomcat installtion.
Following video demonstrates how to Launch New ubuntu Instance,Install Tomcat,upgrade to v8.0[attribute] in RLCatalyst:
Scenario 10 : Provider Sync and Import Instances
Once the basic data is loaded, you can start exploring RLCatalyst from the Provider-Sync Feature. You can sync nodes from your AWS provider account and convert the nodes to ‘Managed’. This will give a control on your AWS infra by letting you track the capacity, cost and usage . Once sync-ed, you can see the summary dashboard from ‘Track’
- Add your AWS Provider. Skip this step if Scenario6 is already executed
- In Settings, under DevopsSetup -> Providers, add a New provider by entering the valid details Please refer to Providers for more details.
- Provider Sync. Once the provider account is added, you can start importing the nodes into RLCatalyst . Importing will bootstrap the nodes with the configured chef server . The imported instances can be managed from the workzone, under the project and environment to which the nodes are imported.
- Click on Sync instances button of your provider
- Import the instances into Catalyst [Unassigned to managed]
To import the node from unassigned to managed instances you have to do the following settings:
Inside Tags tab -> “create tag name to catalyst entity mapping” table, select tag names from dropdown list for Business Group, Project and Environment then save.
Now, goto Mappings tab, add tag values for each Business Group, Project and Environment then Save.
Go to Instances tab, select catalyst status as: unassigned
Enter tag values which you mapped in mappings tab with respect to Business Group, Project and Environment, select the node and click on “Update tags” then the node will come under Assigned Instances and from here you can select the node and can import that Instance. By clicking on “Import Instances” button it will come under managed Instances,
Please refer to providersync and-import for more details.
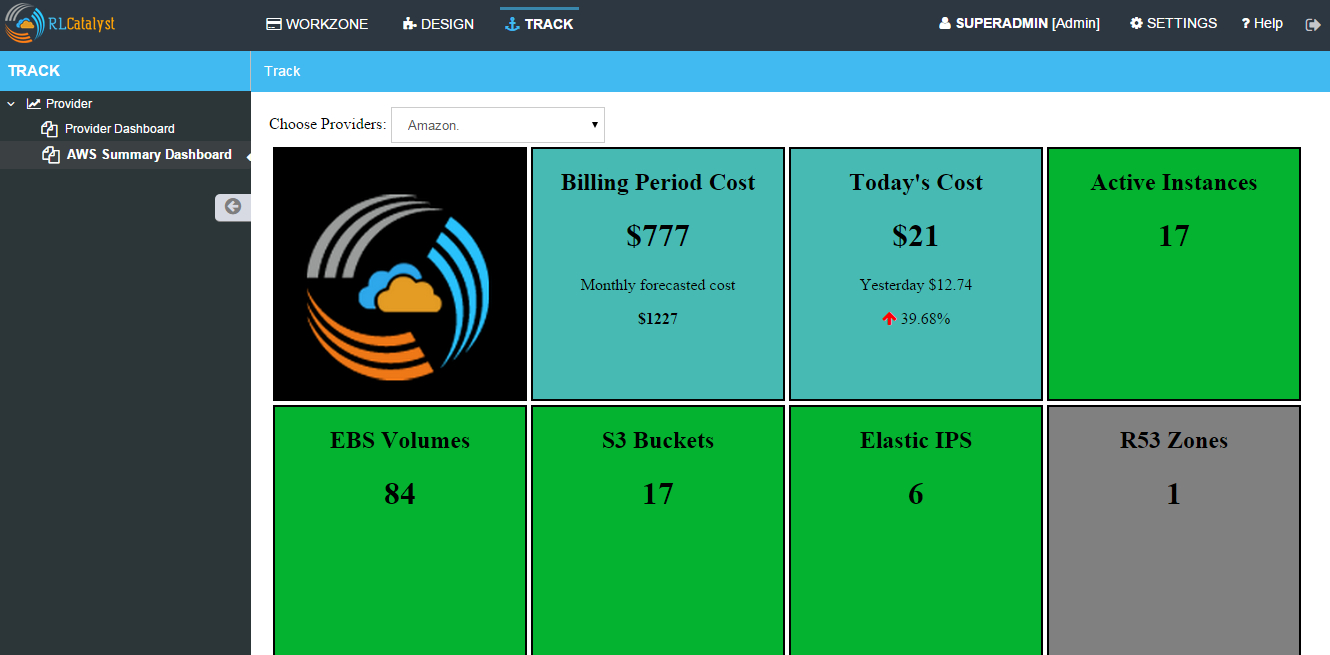
Scenario 11 : AWS Cost, Usage Dashboards
RLCatalyst provides you a consolidated dashboard for tracking your AWS infrastructure cost and usage . This helps you to identify un-used capacity and do better utilization. RLCatalyst summarizes this data for all the AWS provider accounts configured.
Follow the instructions to configure your dashboards:
- Add Provider . Skip this step if Scenario6 is already executed
In Settings, under DevopsSetup -> Providers, add a New AWS provider by entering the valid details
Please refer to Providers for more details.
- Track -> usage and cost dashboards
- Reports
Click on Tracks under Capacity you will be able to see Reports This will give you the snapshot of instances - Total Number vs Number of Managed vs Number of Un-Managed.
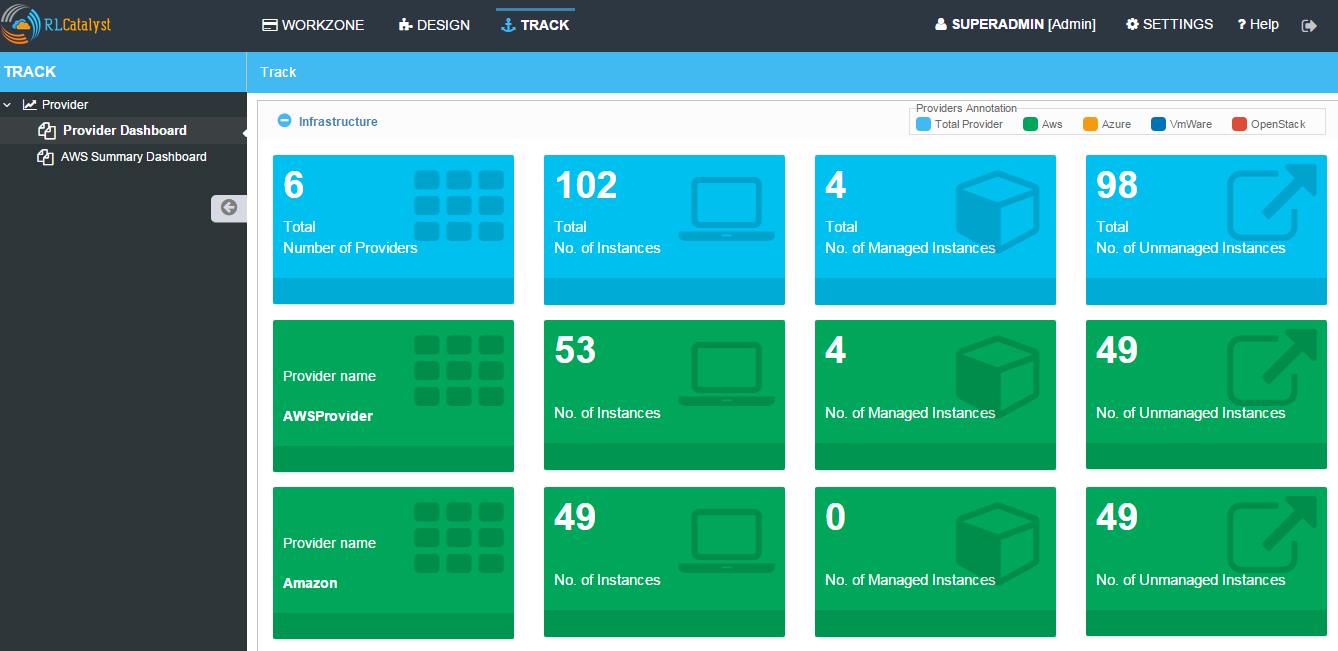
- AWS Summary Dashboard
Click on Tracks under provider in AWS you will be able to see AWS Summary Dashboard This will give you the snapshot of Total cost, Daily cost etc.
Following video demonstrates how to view AWS Cost,Usage dashboards in RLCatalyst:
Scenario 12: Deploy Wordpress on multiple docker container
Here, we are creating docker template for mySql, wordpress and deploying on a ubuntu node, accessing it.
- Create a docker template for MYSQL
- Go to Settings -> Gallery Setup -> Templates, Enter the Template name -> Choose Template type as Docker -> Choose the Organization
- Add Docker Repo Path as relevancelab/wpmysql and save
- Create a docker template for Wordpress
- Go to Settings -> Gallery Setup -> Templates, Enter the Template name -> Choose Template type as Docker -> Choose the Organization
- Add Docker Repo Path as relevancelab/wordpress and save
- Create Docker bluperint for MYSQL
- In Design -> New tab -> select AWS provider -> select Docker Template Type -> select your template, add the details and save
- Create Docker blueprint for wordpress
- In Design, under New tab, select AWS provider -> select Docker Template Type -> select your template, add the below details and save
- Portmapping: 8080:80
- Linked Container: mysql:mysql
- Launch Ubuntu Node or Import a Ubuntu node
- Click on Chef Client run -> Run docker_install cookbook on that node
- Launch Mysql Docker Blueprints.
- Go to Infrastructure -> Blueprints -> Expand Docker -> Select Mysql blueprint and Click on Launch button -> Select the node -> Click on Start button
- Launch Wordpress Docker Blueprints.
- Go to Infrastructure -> Blueprints -> Expand Docker -> Select Wordpress blueprint and Click Launch button -> Select the node -> Click on Start button
- Go to Containers tab to view the container and thier details.
- Go to Infrastructure -> Containers . You can find 2 containers wordpress and mysql with the details being displayed
- Add Application URL in instance control panel
- Go to Instance -> Control Panel and add application in this format (http://$host:8080)
- Access wordpress Application by clicking the Appname.
- Click on More icon on instance control panel -> Click on the Wordpress application name. User should be able to see wordpress installation page
- Connect to the instance and verify container details are listed
- Click on SSH icon -> Enter the Details and submit , Execute
sudo docker pscommand, Container details should be displayed
Following video demonstrates the Composite Docker for Wordpress:
Scenario 13 : Create CentOS instance and launch Liferay
Creating CentOS instance and launching Liferay application.
- Create template for liferay app
- Go to GallerySetup -> Templates
- Create template by adding deploy_liferay_app cookbbok and save
- Under Desgin create blueprint using the liferayapp template
- Go to Design -> Select liferay template and create blueprint. (Make sure the instance size is atleast 2GB)
- Add application URL http://$host:8001
- Launching blueprint
- Go to Workzone -> Infrastructure -> Blueprints -> Launch the blueprint
- Access Liferay application
- Access Liferay application by clicking on APP link URL present on the Instance card and verify the LifeRay
Following video demonstrates how to Launch New Centos Instance and deploy LifeRay in RLCatalyst:
Scenario 14 : Create and Launch an AWS CFT Blueprint for 2-node Petclinic
Creating and launching an AWS CloudFormation Template Blueprint for two petclinic VM:
- Create CloudFormation Template
- Go to GallerySetup -> Templates
- Create Cloud Formation template by uploading your template file and other details
- Under Desgin create blueprint using cloud formation template
- Go to Design -> select Cloud formation template type -> Next -> select your template -> Next -> Enter Blueprintname, Choose Business Group & project
- In Configure Stack Parameters section provide the valid details for Region, Provider, KeyName, SecurityGroup, AMImage ID, Instance Username and other details
- Launch the Cloud Formation Blueprint
- Go to Workzone -> your respective Environment -> Infrastruture -> Blueprints -> CloudFormation and launch the Blueprint by entering the
Unique stack Name
- Verify the Stack
- Now Verify the Stack at Infrastructure -> CloudFormation, Wait until the Stack shows from CREATE_IN_PROGRESS to CREATE_COMPLETE
- Verify the 2 VM/Instances Launched
- Go to Infrstructure -> Instances, you will be able to see the 2 nodes/VM’s launched and click on MoreInfo icon & wait until both the instances Bootstrap successfully
- Run cookbook multitierdb for VM1
- Click on ChefClient run icon and select multitier_db cookbook and move to runlist and update. Wait Until the Instance Runlist updates
- Run cookbook tomcat & multitierwar for VM2
- Click on ChefClient run icon and select tomcat_all_rl, multitier_war cookbook and move to runlist and update. Wait Until the Instance Runlist updates
- Verify the petclinic application using the VM2 IPAddress
- Now verify the petclinic application using http://VM2 Ipaddress:8080/petclinic. You will be able to access the application
Following video demonstrates how to Create and Launch an AWS CFT Blueprint for 2-node Petclinic in RLCatalyst:
Scenario 15 : Install LAMP Stack on a single node
Installing LAMP stack on a ubuntu node by adding lamp_role cookbook:
- Import a Ubuntu Node to RLcatalyst
- Go to Workzone and expand the Organization tree on the left side to get the environments . Click on Import by IP icon
- Enter the IP Address, Username & select the OS, Config Management, pem file
Please refer to Import By IP for more details
- Chef Client Run on the Instance with LAMP Role and editing the cookbook attributes
- Click on Chef-Client Run icon, select the lamp_role cookbook and move to runlist
- Edit the Cookbook attributes by clicking on the edit button and provide the value for Root Password and update the runlist
- Access Apache
- Access apache at http://$host of that machine
- Access PHP
- Access apache at http://$host/index.php of that machine
- Access MySql
- From RLCatalyst click on SSH icon of the instance and provide the valid details and submit
- Now Enter the following command mysql -u root -p and enter the same Root Password which you provided while editing the cookbook attributes and verify MySql
Following video demonstrates how to Launch New Ubuntu Instance and deploy LAMP[Linux, Apache, MySql, PHP] in RLCatalyst:
Scenario 16 : Allocate and Track AWS Resources
In multi-cloud environmets, it is often tedious to keep track of the resources and to trace back what is allocated to each application/project/team. RLCatalyst lets you allocate your cloud resources across various cloud accounts efficiently with its bulk-synchronization feature. You can do a bulk-import of all resources from an account into RLCatalyst and allocate it to Organisation/Business Group/Projects based on the AWS tags. Moreoever you can update the AWS tags from RLCatalyst, for all the un-tagged resources. This will also give a dashboard on all teh resources, their cost and usage per Org/BU/Project, which can be analysed and take further actions to optimize the resource utilization.
Prerequisite: You must have an AWS account.
1. In SETTING -> DevOps Setup -> Providers, you will get list of providers. And in Action colunm you will find Syn Instances button. By clicking on Syn Instances button, you will get 3 tabs, Tags, Mappings and Instances:
1. Tags: you have two sections, left side you will get the tags which are present in your AWS acccount will shown here and you can add description for your refrence only. And right side you can map the tags with PROJECT ans ENVIRONMENT, Specify which tag represent project name and the environment name. Once you will save it, you can see the refelection in Mapping tab.
- Mappings: In Mapping, all the mapped Tag Values would be visible with respect to Projects and Environment. Select one tag name for project from drop down as well as Environment tag name for Environment And save the changes. Now go to Instances tab.
- Instances: You have 3 catalyst status:
- Managed: If catalyst status is ‘Managed’, you will get all “Bootstraped successfull Instances”. You can delete the instances from here.
- Assigned: In assigned tab you will get mapped instances from mappings. From here you can “Import Instances”.
- Unassigned: Here you will get all other Instances available in your AWS account. Here you can update the tags value by selecting the node.
Following video demonstrates how to Update tags in AWS:
Scenario 17 : Configure and Execute a Jenkins Jobs
Execute your Jenkins job from rlcatalyst and see the history of each jobs. Jenkins server should be configured in rlcatalyst to initiate the job execution. Please refer to * Jenkins
Please refer to Jenkins Task under Orchestration to Create & Execute Jenkins Task
Following video demonstrates how to Create and Execute Jenkins Task in RLCatalyst:
Scenario 18 : Deploy and Promote a Java Application
Here we are deploying and promoting petclinic app.
- Import a ubuntu node or Launch a Blueprint. Wait until the Node Bootstrap successfully.
- Create a Chef Task in Orchestration Tab and Save by adding tomcat-all-rl and deploy_war cookbooks.
- Go to Applications and Deploy New App by clicking +Deploy New App :
- Enter Repository Details: Repository Server, Repository, Group ID, Artifacts and Version which you want to deploy
- Add the job which you created
- Wait until task execution is success
- Verfiy the card with the version you selected in applications.
- Click on Approve and then promote will be enabled
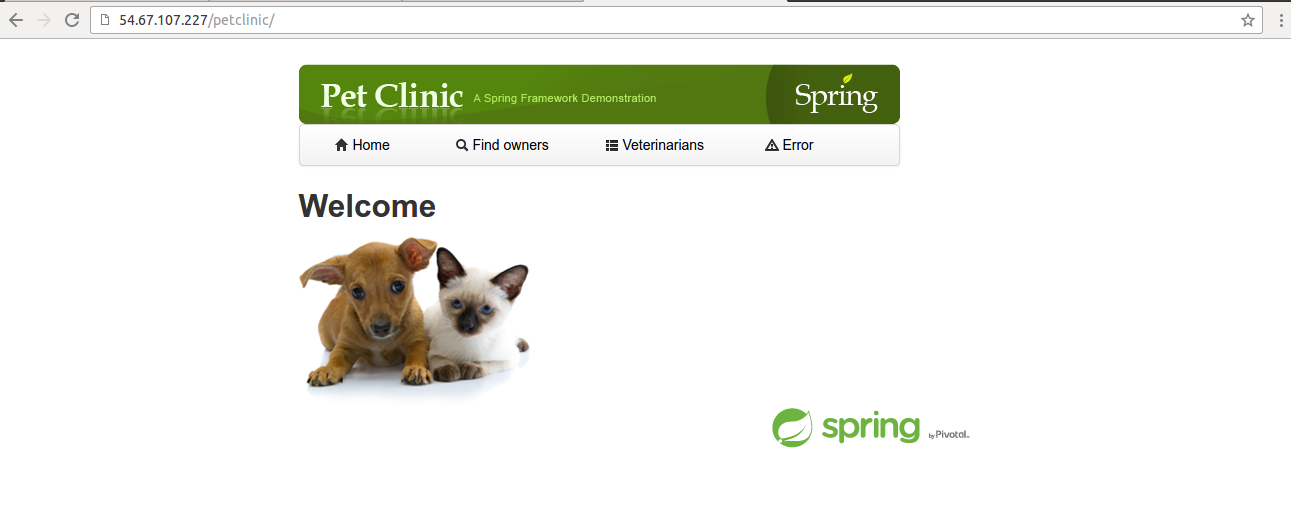
- Now, Access petclinic application in the format http://<ipaddress>:8080/petclinic. Petclinic application home page will open.
Now, Promote Petclinic in other enviornment:
- Import a ubuntu node or Launch a Blueprint. Wait until the Node Bootstrap successfully.
- Create a Chef Task in Orchestration Tab and Save by adding tomcat-all-rl and deploy_war cookbooks.
- Go to applications tab and click on promote and select the target enviornment and Select the job, which you created in step 2 and node, which you launched or imported and click on Promote
- Now, Access petclinic application in the format http://<ipaddress>:8080/petclinic. Petclinic application home page will open.
Following video demonstrates how to Deploy and Promote Petclinic:
Scenario 19 : Deploy a 3-tier application
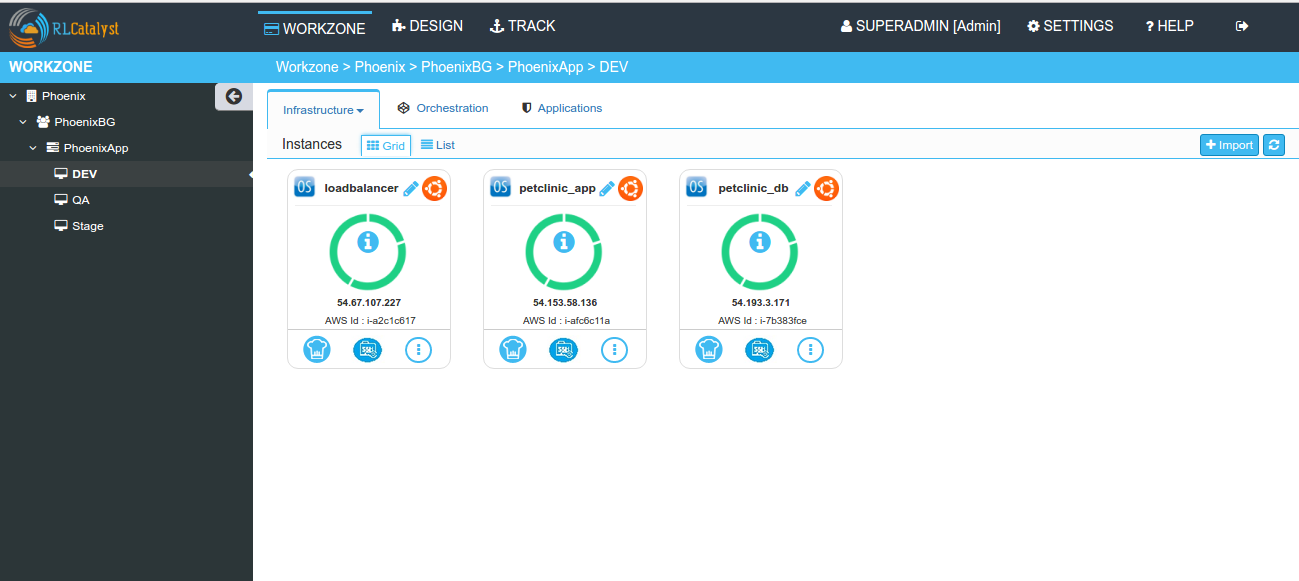
Here we are deploying petclinic app using petclinic database, petclinic application and loadbalancer.
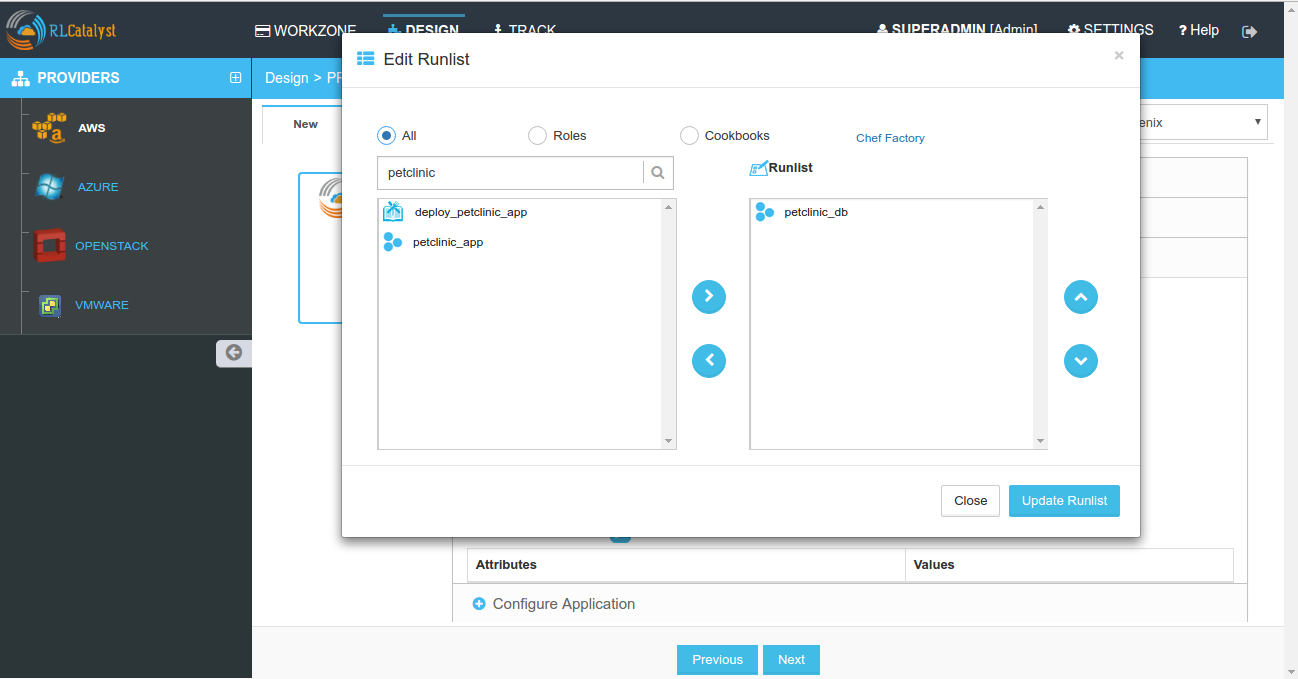
- Create three Blueprints:
- Create a ubuntu blueprint and add role petclinic_db for first blueprint.
- Create a ubuntu blueprint and add role petclinic_app for second blueprint.
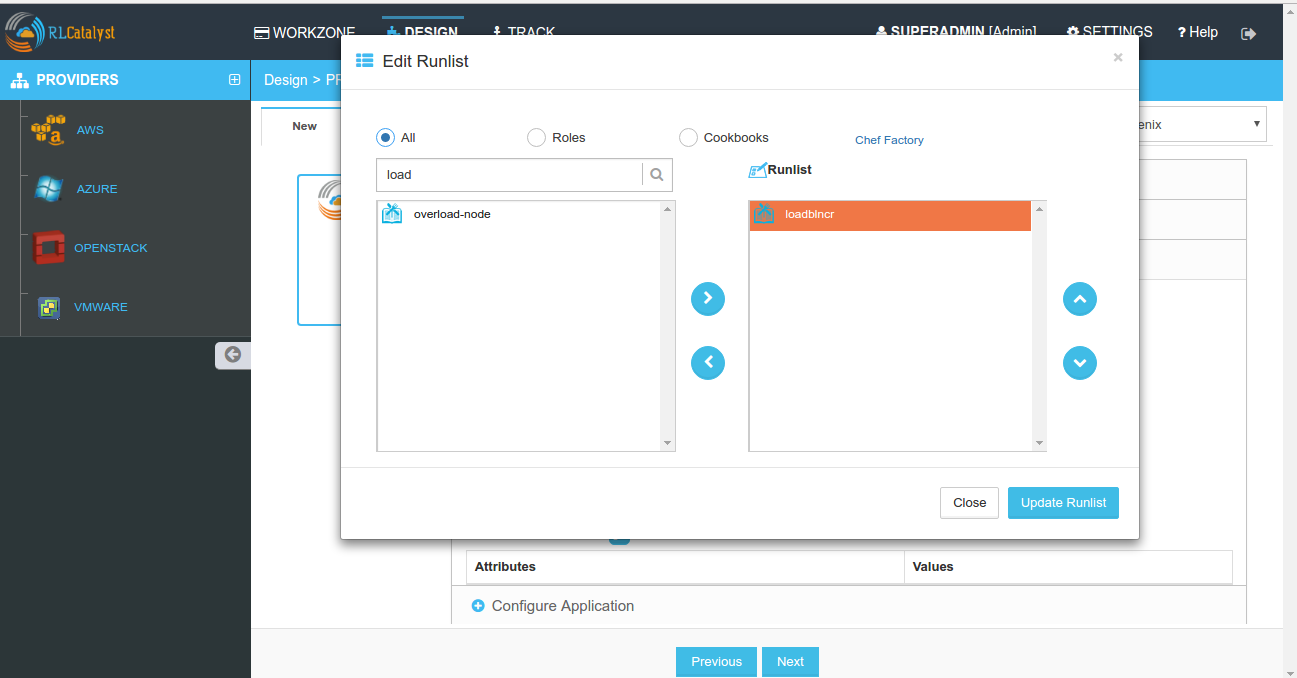
- Create a ubuntu blueprint and add cookbook loadblncr for third blueprint.
- Now, go to WORKZONE -> Infrastructre -> Blueprints and launch your created blueprints one by one. Wait until the Node Bootstrap successfully for each blueprint.
- Now, take the <ipaddress> of load_balancer node and Access petclinic application in the format http://<ipaddress>/petclinic. Petclinic application home page will open.
Following video demonstrates how to Deploy a 3-tier application:
Scenario 20 : Design and Launch Application
Design an entire app and launch instance with the app running.
- Create a Nexus Server with valid details and add Nexus Group ID - org.catalyst and save.
- Now, go To project and edit your project Select the Repository server -Nexus and Repository Name - Catalyst then ADD and save the project.
- Create a Software Stack Template for catalyst or petclinic and save. Add cookbook deploy_upgrade_catalyst for catalyst and tomcat-all-rl & deploy_war for petclinic accordingly.
- Go To Design & Create a Softwarestack bluperint using the template, which you created and add call back URL http://catalyst3.rlcatalyst.com/app-deploy or app/deploy and save the blueprint.
- Go to Workzone and launch the Blueprint.
- Now, go to Instances copy the IP of your launced blueprint and open new tab, paste that IP:3001 to verify- the App is deployed or not.
Following video demonstrates how to deploy Application during Instance launch using Nexus Server:
Scenario 21 : Design and Launch 3-tier Application
Here we are going to launch Petclinic Application. petclinic Data Base, petclinic App and petclinic web(load balancer), for this we need to create blueprint for each of software stack type.
- While creating blueprint for petclinic database add petclinic_db role.
- Add petclinic_app role while creating blueprint for petclinic app.
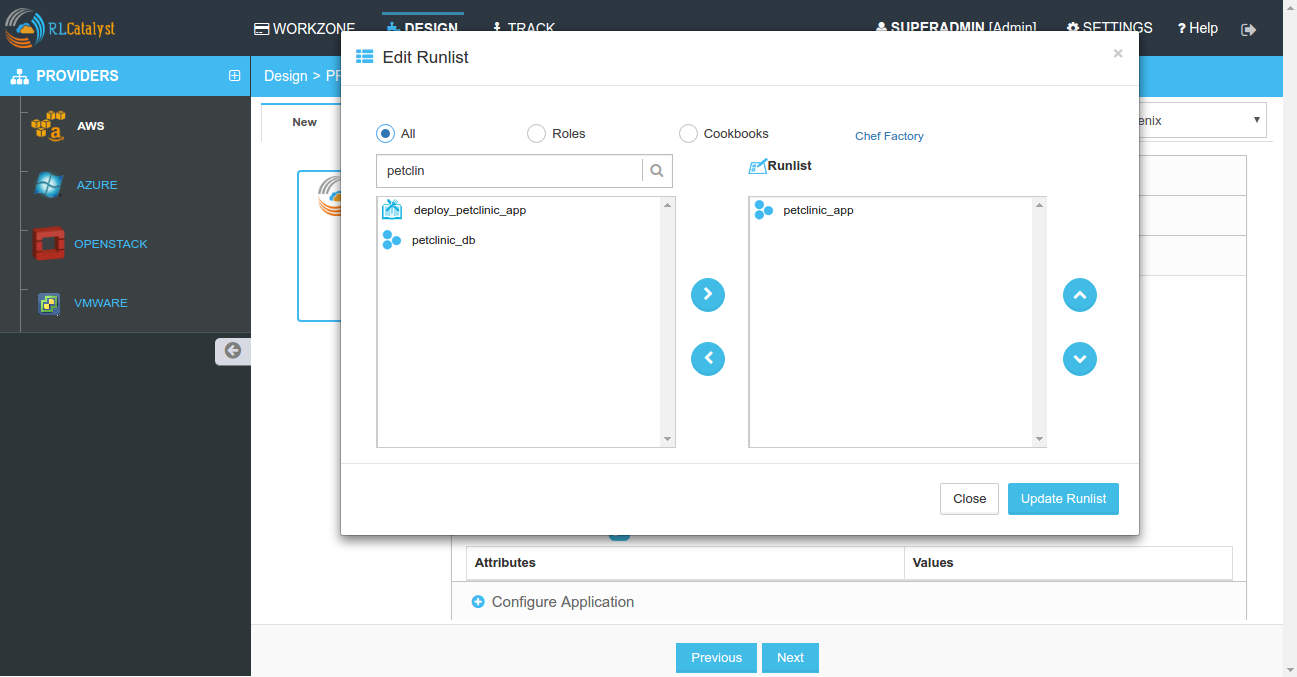
- Add loadblncr cookbook while creating blueprint for petclinic web.
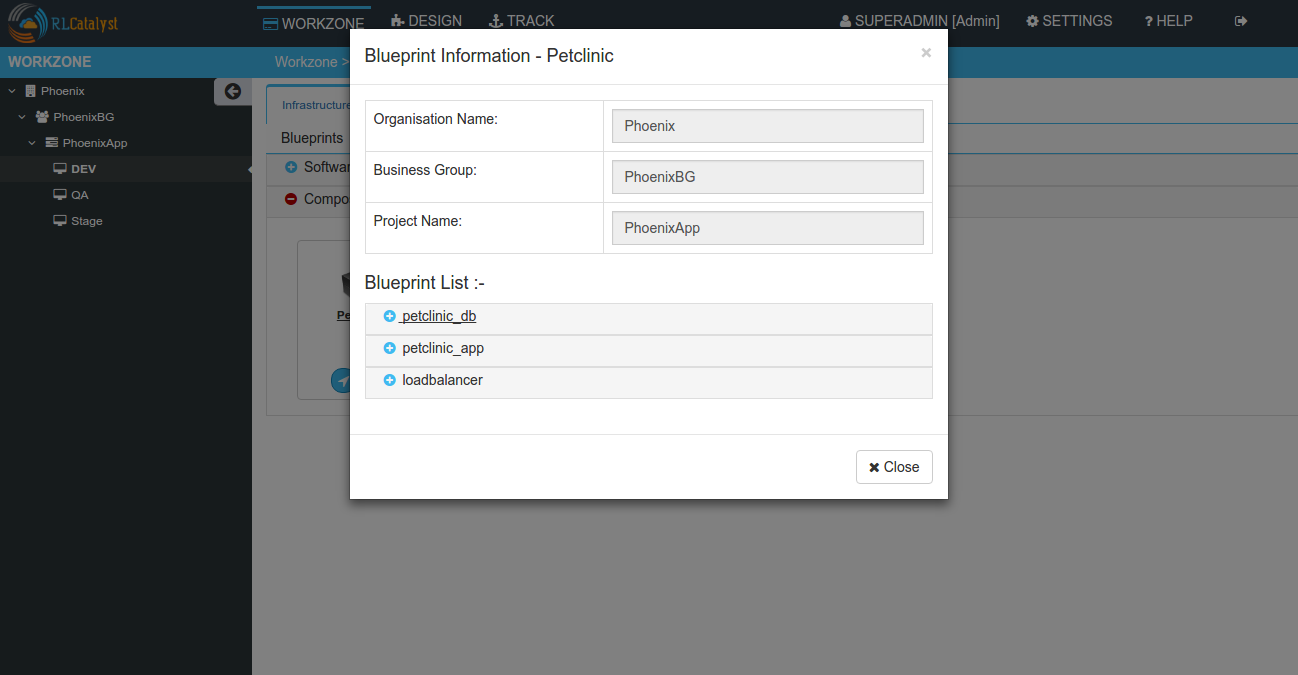
Now, create new Composite type blueprint

Add those 3 blueprints in composite type blueprint into Selected Blueprint and Save it.
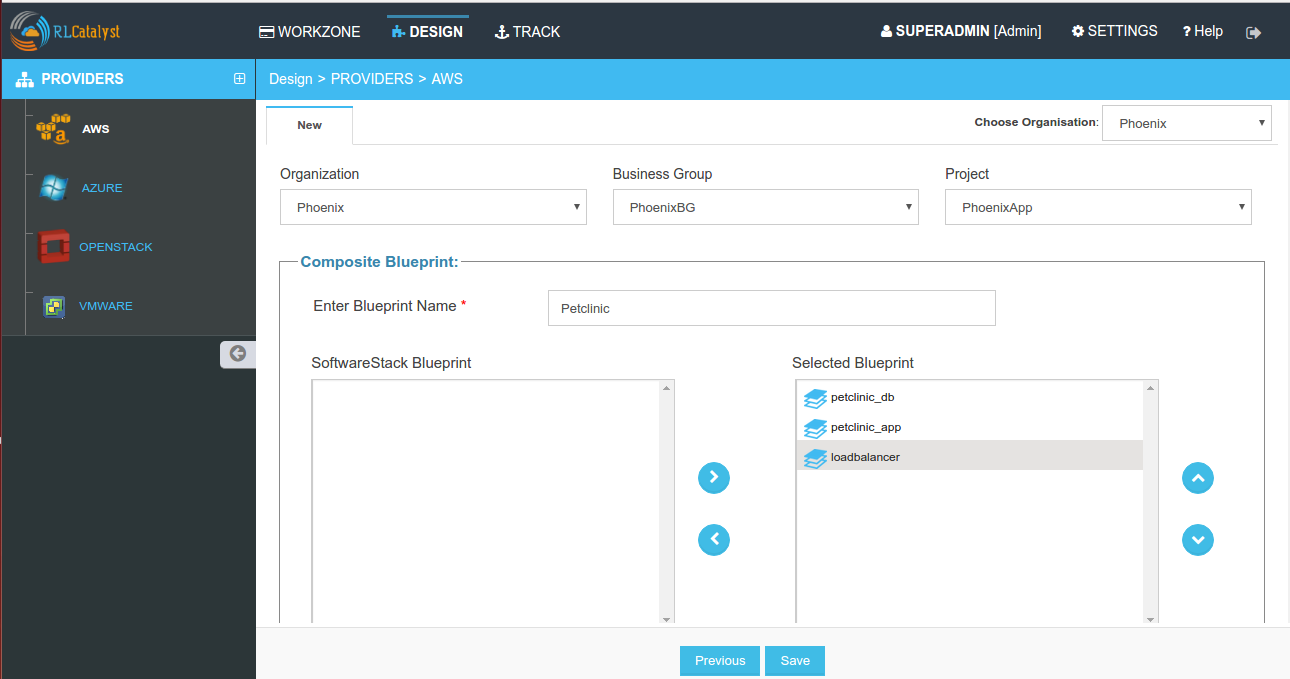
Once it is created user can see the blueprint under Composite. User can delete, Launch the blueprint by clicking on specified buttons.
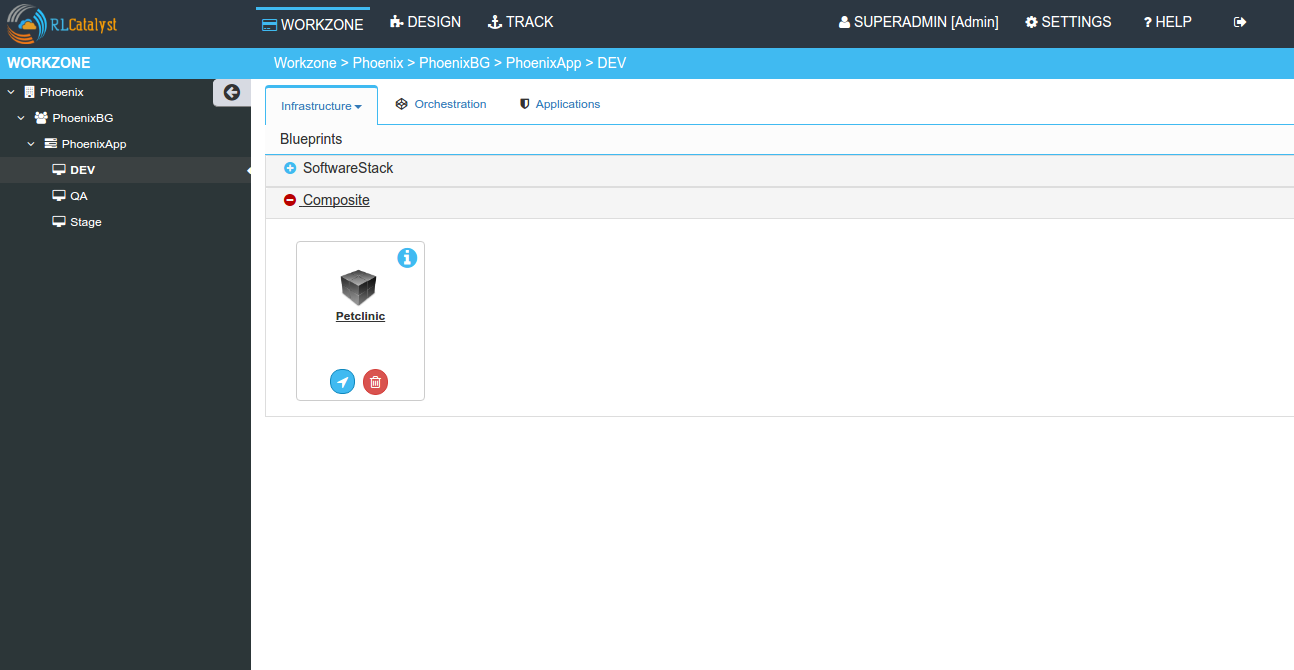
And user can also see all the details of composite blueprint by clicking on information button.
Launch by clicking on launch button, it will ask for confirmation before start launching it.
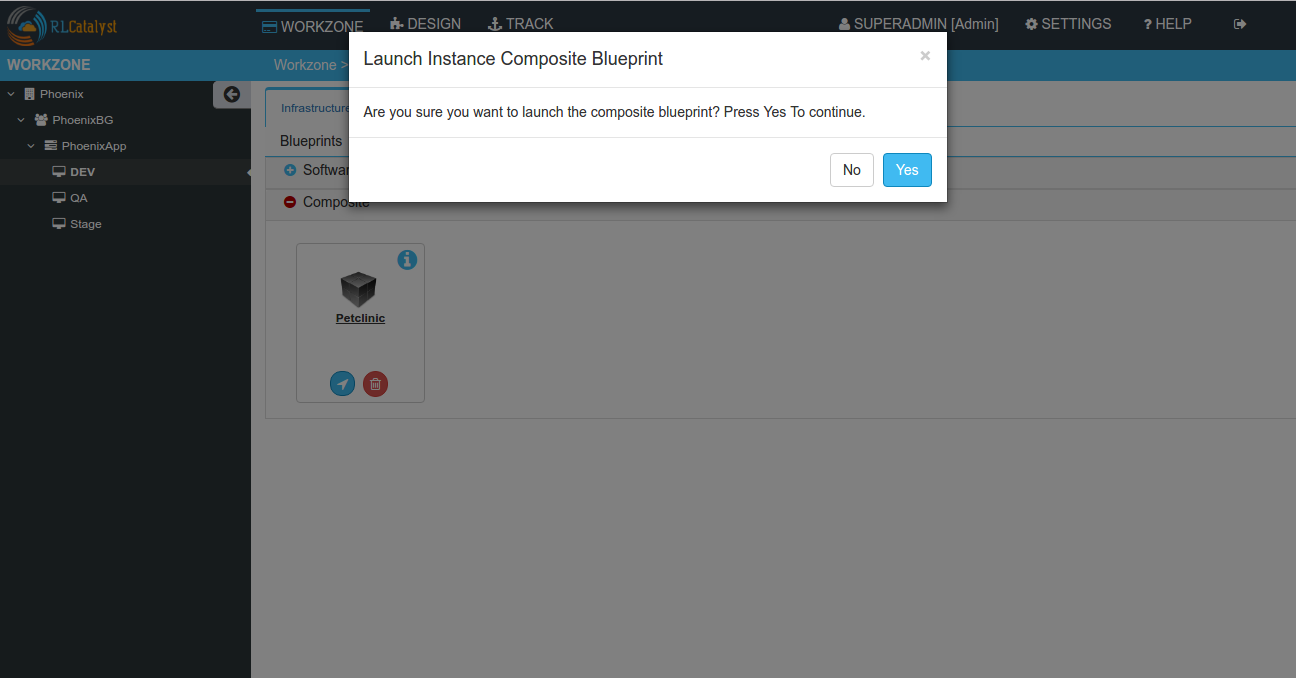
Once you will confirm it to launch, it will start launching petclinic_db, petclinic_app and loadbalancer one by one. First it will start launching petclinic_db
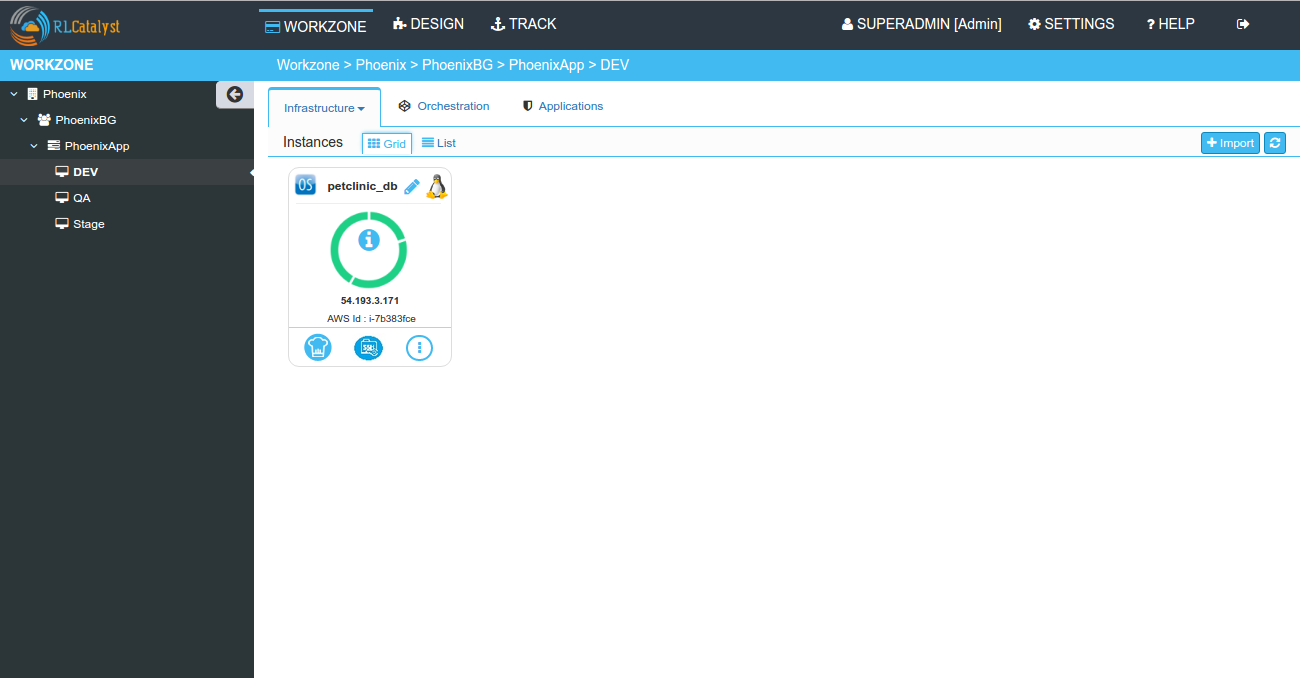
When petclinic_db will be bootstraped successfully then only it will start with petclinic_app.
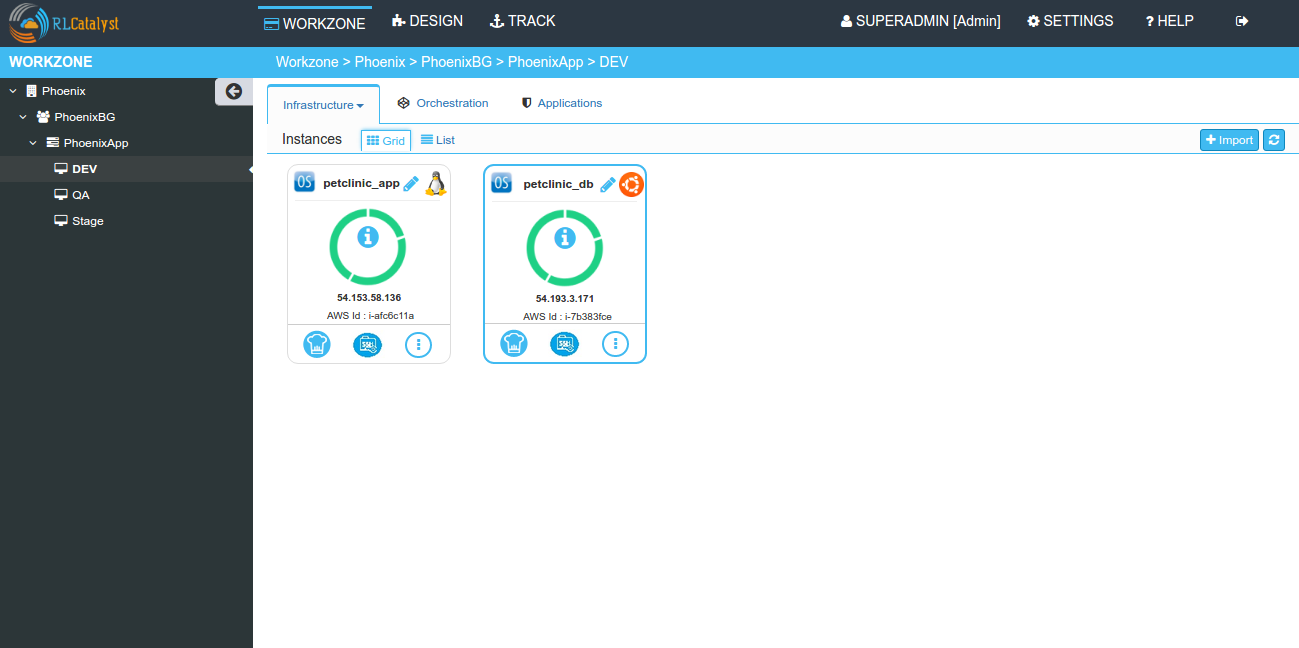
Similarly when petclinic_app will bootstraped successfully then it will start launching loadbalancer.
Now, to access the application, open new tab and access petclinic app with ip address petclinic app <ipAddress>:8080/petclinic
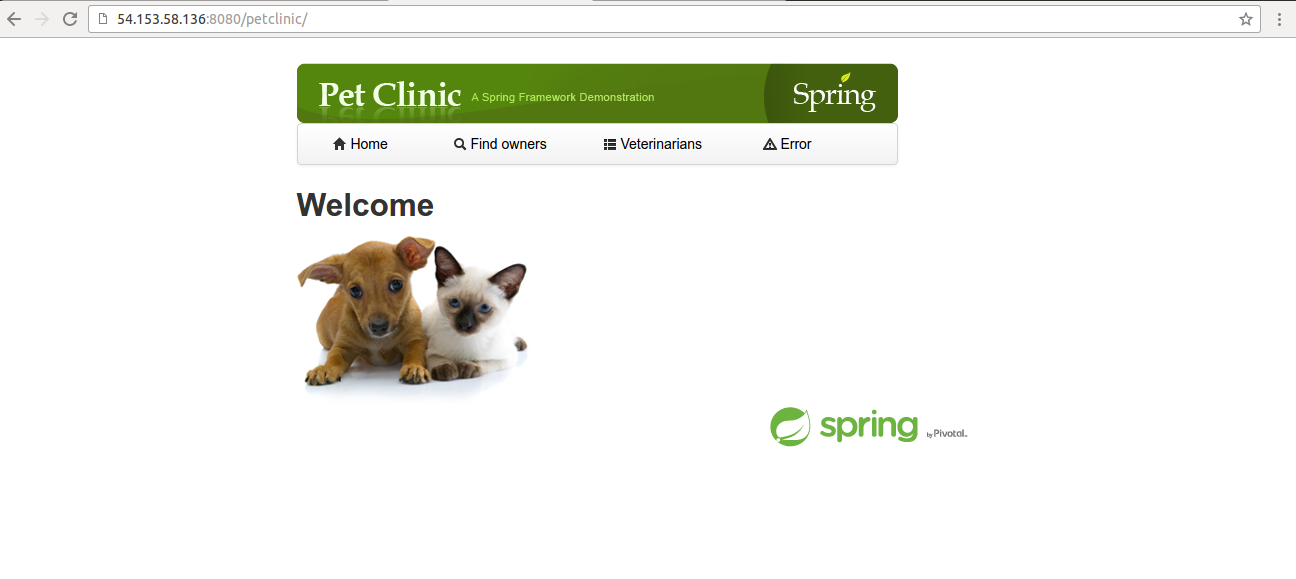
And to access the application with ip address of loadbalancer into new tab type <ipAddress>/petclinic